PyTorch
基础配置
搭建环境
- Python3.9
- PyTorch 2.4.1
- CUDA 12.1
- NVIDIA GeForce RTX 4060 Laptop GPU
Anaconda
创建环境:conda create -n your_env_name python=X.X (X.X
为 python 版本) eg: conda create -n pytorch_tutorial python=3.7
激活环境:source activate your_env_name
eg: source activate pytorch_tutorial
退出环境:source deactivate
删除环境:conda remove -n your_env_name –all
eg: conda remove -n pytorch_tutorial –all
查看已有虚拟环境:conda env list / conda info -e
PyCharm
- 批量注释:Ctrl + /
- 快速查看文档:Ctrl + q
- 搜索:Ctrl+f
- 运行:Shift + F10
- Tab / Shift + Tab 缩进、不缩进当前行
- Ctrl + D 复制选定的区域或行
- Ctrl + Y 删除选定的行
JupyterNotebook
命令模式:
- 插入单元格: A 键上方插入,B 键在下方插入
- 合并单元格:选中多个单元格,Shift + M
- 显示行号:L
- 删除单元格:连续按两次
D - 剪切单元格:X。 通常我用
X 代替删除,毕竟只用按一个键,哈哈。 - 复制粘贴单元格: C/V
- 撤销删除的单元格:要撤消已删除的单元格,请按 Z 键
编辑模式:
- 运行单元格:Ctrl + Enter
- 运行并创建新单元格:Alt + Enter
- 分割单元格:光标放到想要分割的地方,Ctrl + Shift + -
- 函数详情:Shift+Tab (注意,要把模块导入才会提示函数详情!)
Pytorch Tutorial
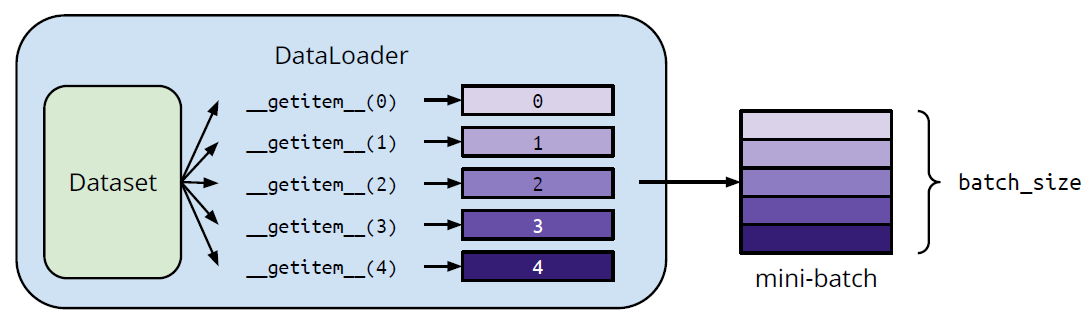
Step 1. torch.utils.data.Dataset & torch.utils.data.DataLoader

Dataset & Dataloader
Dataset: 存储数据样本与期望值
Dataloader: 将数据分批次并进行多道处理
具体用法:
1
2
3
4
5
6
7
8
9
10
11
12
13
14
15
16
17
18
from torch.utils.data import Dataset, DataLoader
# 自定义数据集
class MyDataset(Dataset):
# Read data & preprocess
def __init__(self, file):
self.data = ...
# Returns one sample at a time
def __getitem__(self, index):
return self.data[index]
# Returns the size of the dataset
def __len__(self):
return len(self.data)
dataset = MyDataset(file)
# Training: True
# Testing: False
dataloader = DataLoader(dataset, batch_size=5, shuffle=True)
Tensors(张量)
高维矩阵
/ 数组 创建方法
1
2
3
4
5
6
7
# Directly from data (list or numpy.ndarray)
x = torch.tensor([[1, -1], [-1, 1]])
x = torch.from_numpy(np.array([[1, -1], [-1, 1]]))
# Tensor of constant zeros & ones
x = torch.zeros([2, 2])
x = torch.ones([1, 2, 5])常用操作符:
1
2
3
4
5
6
7
8
9
10
11
12
13
14
15
16
17
18
19
20
21
22
23
24
25
26
27
28
29
30
31
32
33
34
35
36
37
38
39
40
41
42
43
44
45
46
# 加法
z = x + y
# 减法
z = x - y
# 乘幂
y = x.pow(2)
# 求和
y = x.sum()
# 平均
y = x.mean()
# Transpose: transpose two specified dimensions
>>> x = torch.zeros([2, 3])
>>> x.shape
torch.Size([2, 3])
>>> x = x.transpose(0, 1)
>>> x.shape
torch.Size([3, 2])
# Squeeze: remove the specified dimension with length = 1
>>> x = torch.zeros([1, 2, 3])
>>> x.shape
torch.Size([1, 2, 3])
>>> x = x.squeeze(0) # dim = 0
>>> x.shape
torch.Size([2, 3])
# Unsqueeze: expand a new dimension
>>> x = torch.zeros([2, 3])
>>> x.shape
torch.Size([2, 3])
>>> x = x.unsqueeze(1) # dim = 1
>>> x.shape
torch.Size([2, 1, 3])
# Cat: concatenate multiple tensors
>>> x = torch.zeros([2, 1, 3])
>>> y = torch.zeros([2, 3, 3])
>>> z = torch.zeros([2, 2, 3])
>>> w = torch.cat([x, y, z], dim=1) #因为三个张量的第0、2 维度均相同,所以沿第 1 维度进行拼接
>>> w.shape
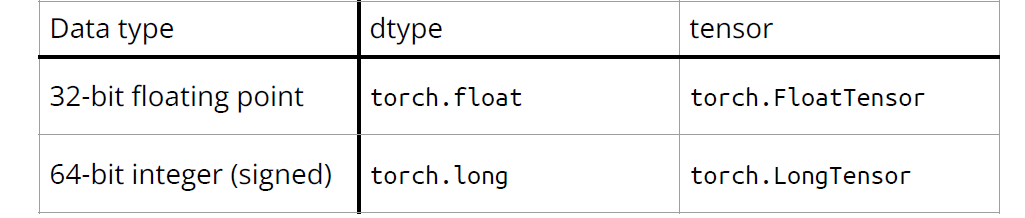
torch.Size([2, 6, 3])数据类型:对模型和数据使用不同的数据类型会产生错误
运行设备:使用.to()
让张量在合适的设备上进行计算 1
2
3
4
5
6
7
8# CPU
x = x.to(‘cpu’)
# GPU
x = x.to(‘cuda’)
# 检查电脑是否有英伟达GPU
torch.cuda.is_available()Gradient Calculation(梯度计算)
1
2
3
4
5
6>>> x = torch.tensor([[1., 0.], [-1., 1.]], requires_grad=True)
>>> z = x.pow(2).sum()
>>> z.backward()
>>> x.grad
tensor([[ 2., 0.],
[-2., 2.]])
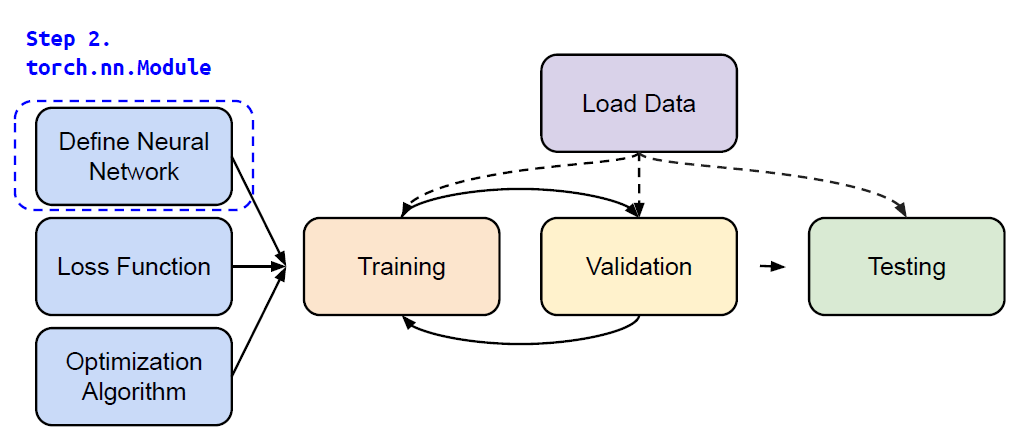
Step 2. torch.nn.Module
线性层(全连接层)
1
nn.Linear(in_features, out_features)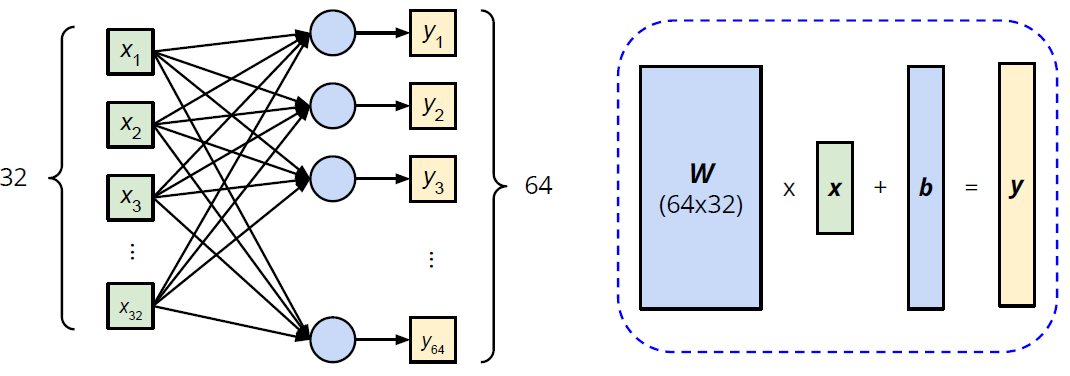
1
2
3
4
5>>> layer = torch.nn.Linear(32, 64)
>>> layer.weight.shape
torch.Size([64, 32])
>>> layer.bias.shape
torch.Size([64])非线性激活函数
1
2
3
4# Sigmoid Activation
nn.Sigmoid()
# ReLU Activation
ReLU Activation构造自己的神经网络
1
2
3
4
5
6
7
8
9
10
11
12
13
14
15
16
17
18
19
20
21
22
23
24
25
26
27
28
29import torch.nn as nn
# Initialize your model & define layers
class MyModel(nn.Module):
def __init__(self):
super(MyModel, self).__init__()
self.net = nn.Sequential(
nn.Linear(10, 32),
nn.Sigmoid(),
nn.Linear(32, 1)
)
# Compute output of your NN
def forward(self, x):
return self.net(x)
# 以下为等价写法
import torch.nn as nn
class MyModel(nn.Module):
def __init__(self):
super(MyModel, self).__init__()
self.layer1 = nn.Linear(10, 32)
self.layer2 = nn.Sigmoid(),
self.layer3 = nn.Linear(32,1)
def forward(self, x):
out = self.layer1(x)
out = self.layer2(out)
out = self.layer3(out)
return out
Step 3. torch.nn.MSELoss, torch.nn.CrossEntropyLoss etc.
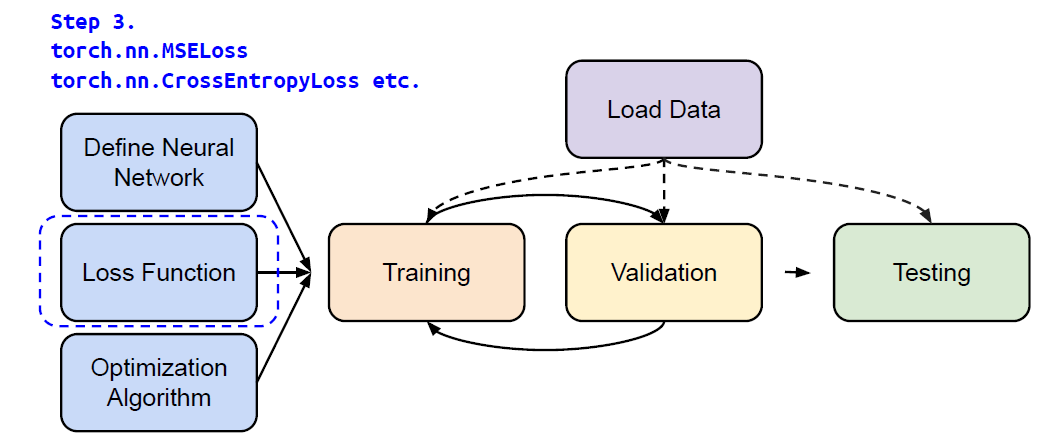
Mean Squared Error (for regression tasks)
1
criterion = nn.MSELoss()Cross Entropy (for classification tasks)
1
criterion = nn.CrossEntropyLoss()loss = criterion(model_output, expected_value)
Step 4. torch.optim
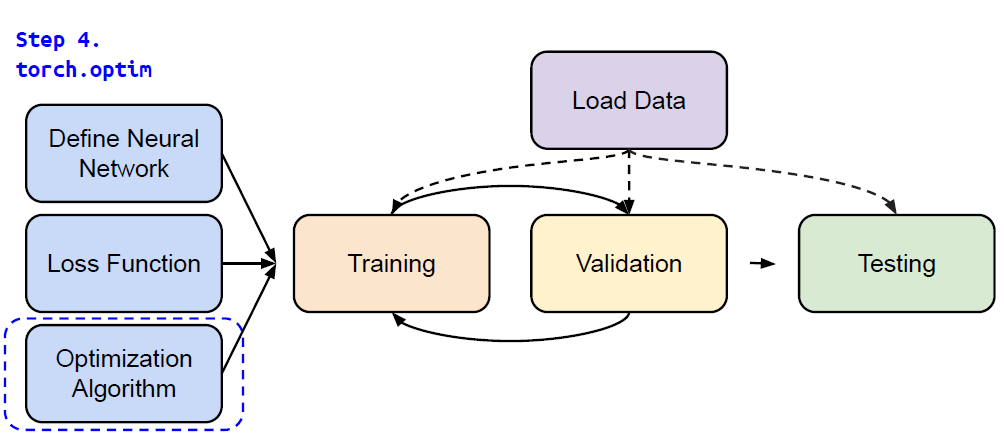
Gradient-based optimization algorithms that adjust network parameters to reduce error.
1
optimizer = torch.optim.SGD(model.parameters(), lr, momentum = 0)For every batch of data:
- Call
optimizer.zero_grad()to reset gradients of model parameters. - Call
loss.backward()to backpropagate gradients of prediction loss. - Call
optimizer.step()to adjust model parameters.
- Call
Step 5. Entire Procedure

1 | |
PyTorch
https://striver98.github.io/2025/01/10/PyTorch